On-Call Schedule
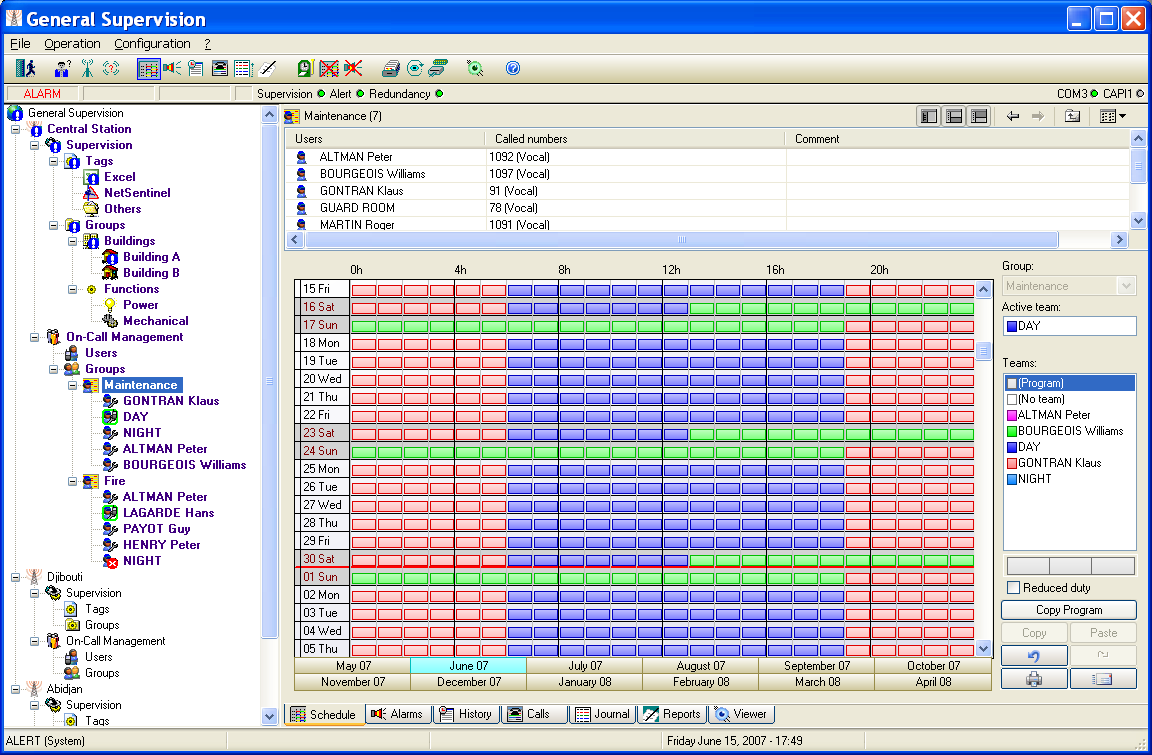
To display and update the on call schedule, select the " Schedule" command in the "Operation" menu or just click on the button . On the main screen, to access to the on -call schedule, select the Schedule tab on the bottom of the screen.
This screen displays the schedule of teams to call for a group on a period of 12 months from the previous month of the current month. The selected group is the group displayed at the top right of the screen. To select another group, click on the arrow of the Groups control, and then select the wanted group in the dropdown list. This field is grayed when the group is selected in the tree of the main screen.
Teams to call are represented by color strips. To identify the represented teams, use the "color legend" represented by the team list of the selected group, on the right of the screen. One can also visualize and modify the content of a team by double -clicking in the list on the team in question. When the team planed on a period cannot be reached (operators off-duty or without valid dial number), the corresponding strips are displayed with a "?". By default, the on -call schedule displays the weekly program of the selected group, applied to the visualized calendar period. This programming is represe nted by light color strips (color of the associated team lighted). The periods programmed as reduced duty periods are represented by half strips. The weekly programming can be overwritten by forcing a team on specific calendar periods, symbolized by dark color strips (darkly color of the associated team). The visible part of the timetable corresponds to days displayed on the left of the screen, for the month selected in the panel of buttons located below. The selected month always corresponds to the 1st day displayed in the schedule. Days of the week are represented with a white ground color lightly grayed . Days of the weekend (Saturday and Sunday) are represented with a light gray ground color. The holiday days are represented with a gray ground color. The holiday days marked with a cross in the column on the left are fixed holiday days, independent of the year. Months are separated by a red line. The schedule table can be scrolled from the 1st day of the month preceding the current month to the last day o f the 10th month following the current month by using the scroll bar on the right of the table: day by day by clicking on the up or down arrows, week by week by clicking above or below the scroll bar button, or by block by dragging this button. By clicking on a "month" button, one directly reaches the schedule for the month in question, from the 1st day of the selected month.
The field Active team displays the name of the team which is actually on duty (team called in case of alarm concerning t he group). This team can be the scheduled team, a forced team (group in derogation), or a team having processed to a team changeover in advance. If this field is marked "No team", there is no active team for the group. Following the status of the team chan geover, a further indication can be displayed below this field: Changeover done The scheduled team has changed over (team in advance). Changeover waited (n) Waiting for team changeover (the team is late or duty ended in mandatory team changeover mode). The value that can be displayed in brackets (n) indicates the remaining time (in minutes) before timeout expired. Changeover timeout The timeout for waiting the team changeover is expired. Duty ended The duty is ended (before the programmed time, except in mandatory team changeover mode).
The left column of the table allows the public holidays of the current year to be defined. To define a day of the displayed schedule table like holiday, click once in the first column of the wanted day. The day is refreshed with a beige ground color. This day is defined like
holiday for the current year. It will be automatically redefined like normal day for the following year. A second click in this column on the same line displays a cross (X). It means that the day is defined like holiday independent of the year (December 25 for example). This day will remain registered like holiday for the following years. A new click in this column suppresses the definition of holiday for the day in question (white or yellow ground color). Note: the public holidays defined in the schedule table of a group apply to all groups.
To reinitialize the schedule table from the weekly on -call program which is defined for the selected group, click on the Copy Program button. This action results in the deletion of all the forced area, from the current day and hour for the next eleven months. The Copy Program button is validated only when a program is defined for the selected group.
To force an on-call team on the timetable: a) Select a team in the list of teams of the group with one of the mouse buttons. The color of team selected for the mouse button in question appears in one of the 3 representative windows of mouse buttons, located under the list of teams. The choice " (Program)" means one wishes restore the programmed team (in the weekly program of the group) on the drawn area (programming restoration). The choice "(No team) " means one wished no team on the drawn area (schedule erasure). b) If one wishes to define a reduced duty period for the selected team, check the Reduced duty option. During reduced duty periods, the team is only called for the alarms having a priority level higher than or equal to the minimal level defined in alarm options (see § 7.4 "Alarm options"). c) Bring the mouse pointer on the timetable, on the cell corresponding at the 1st hour of the 1st day of wanted time area, the n press the button corresponding to the team in question. Drag the mouse pointer, keeping the button pressed, to the cell corresponding to the last hour of the last day of the chosen time area. So release the button. The defined time area becomes colored w ith the color of the selected team. If the Reduced duty option was selected, the strips corresponding to the selected time area are represented by half strips. Note 1: it is not possible to modify the schedule for a past period ; if the defined time area o verlaps an area belonging to the past, just the part corresponding to the future (from the current hour) will be taken into account. Note 2: if the time area to define is not rectangular, you should proceed in many times, for each of the rectangular part of the area.
To duplicate groups of days of the schedule table (weeks, fortnight...):
a) Select first the area to copy. To do that, click in the day column of the table, on the 1st wished day and drag the mouse cursor until the last day of the wanted selection, keeping the button pressed. The selection is displayed in reverse video. The Copy button (on bottom right of the screen) is validated. b) Click on the Copy button. The Paste button becomes valid. c) Select, in the day column of the table, the 1st day of the recipient area by clicking over. The selected day is displayed in reverse video. d) Click on the Paste button. The previously copied selection is reproduced. The operations c) and d) can then be reproduced again, the c opied selection being always valid. Note: it is not possible to modify the schedule for a past period; if the selected period overlaps an area belonging to the past, just the part corresponding to the future (from the current hour) will be modified.
Click on the button to undo the operations performed on the schedule table (team assignment or deletion, duplication, program copy). Each time this button is clicked, the preceding operation is canceled. It is possible to undo up to the 10 last performed operations. This button is validated only if there is at least one operation to undo. Click on the button to come back on the cancellation done. It is validated only if at least one undo operation has been performed.
To print the monthly schedule table of the selected group, choose the desired month and click on the button , at the bottom right of the windows. The printer which will be used is the printer selected by the Print setup... command of the File menu. If no setup has been performed, it is the default printer.
Click on the button to directly call the operators of the team which is currently on duty and to transmit them a service message. This action displays the call dialog box (see § 6.11 "Sending a messa ge"), with a list of addressees preset with the operators of the current team.